由 AI 驱动
  • 主页
  • 手册
    • SQL 手册
    • R 手册
    • Python 手册
    • 机器学习手册
    • TensorFlow 手册
    • AI 手册
  • 博客
  • CV / 简历

On this page

  • 项目概览
    • 核心特性
      • 多输入支持
      • 多模型架构
      • 高级功能
    • 技术架构
      • 核心依赖
      • 应用程序结构
      • 多模型处理
    • 用户界面设计
      • 布局结构
      • 双语支持
    • 性能优化
      • 模型性能对比
      • Apple Silicon 加速
      • 云端 API 的图像压缩
    • 部署与生产特性
      • 会话管理
      • 错误处理
    • 快速开始
      • 前提条件
      • 安装步骤
      • API 配置
      • 快速使用示例
    • 未来增强方向
    • 结论

使用 Streamlit 构建的 YOLO 目标检测应用

  • Show All Code
  • Hide All Code

  • View Source
AI
API
tutorial
Author

Tony D

Published

November 5, 2025

项目概览

该应用是一个全面的 Streamlit Web 应用程序,利用 YOLO11(Ultralytics 框架)提供目标检测功能,支持多种输入源和处理后端。该项目的特别之处在于其多模型架构和生产级别的特性。

在线演示: https://yolo-live.streamlit.app/

Github: https://github.com/JCwinning/YOLO_app

  • 目标检测
  • 物体识别

应用程序截图 - 主界面

应用程序截图 - 检测结果

核心特性

多输入支持

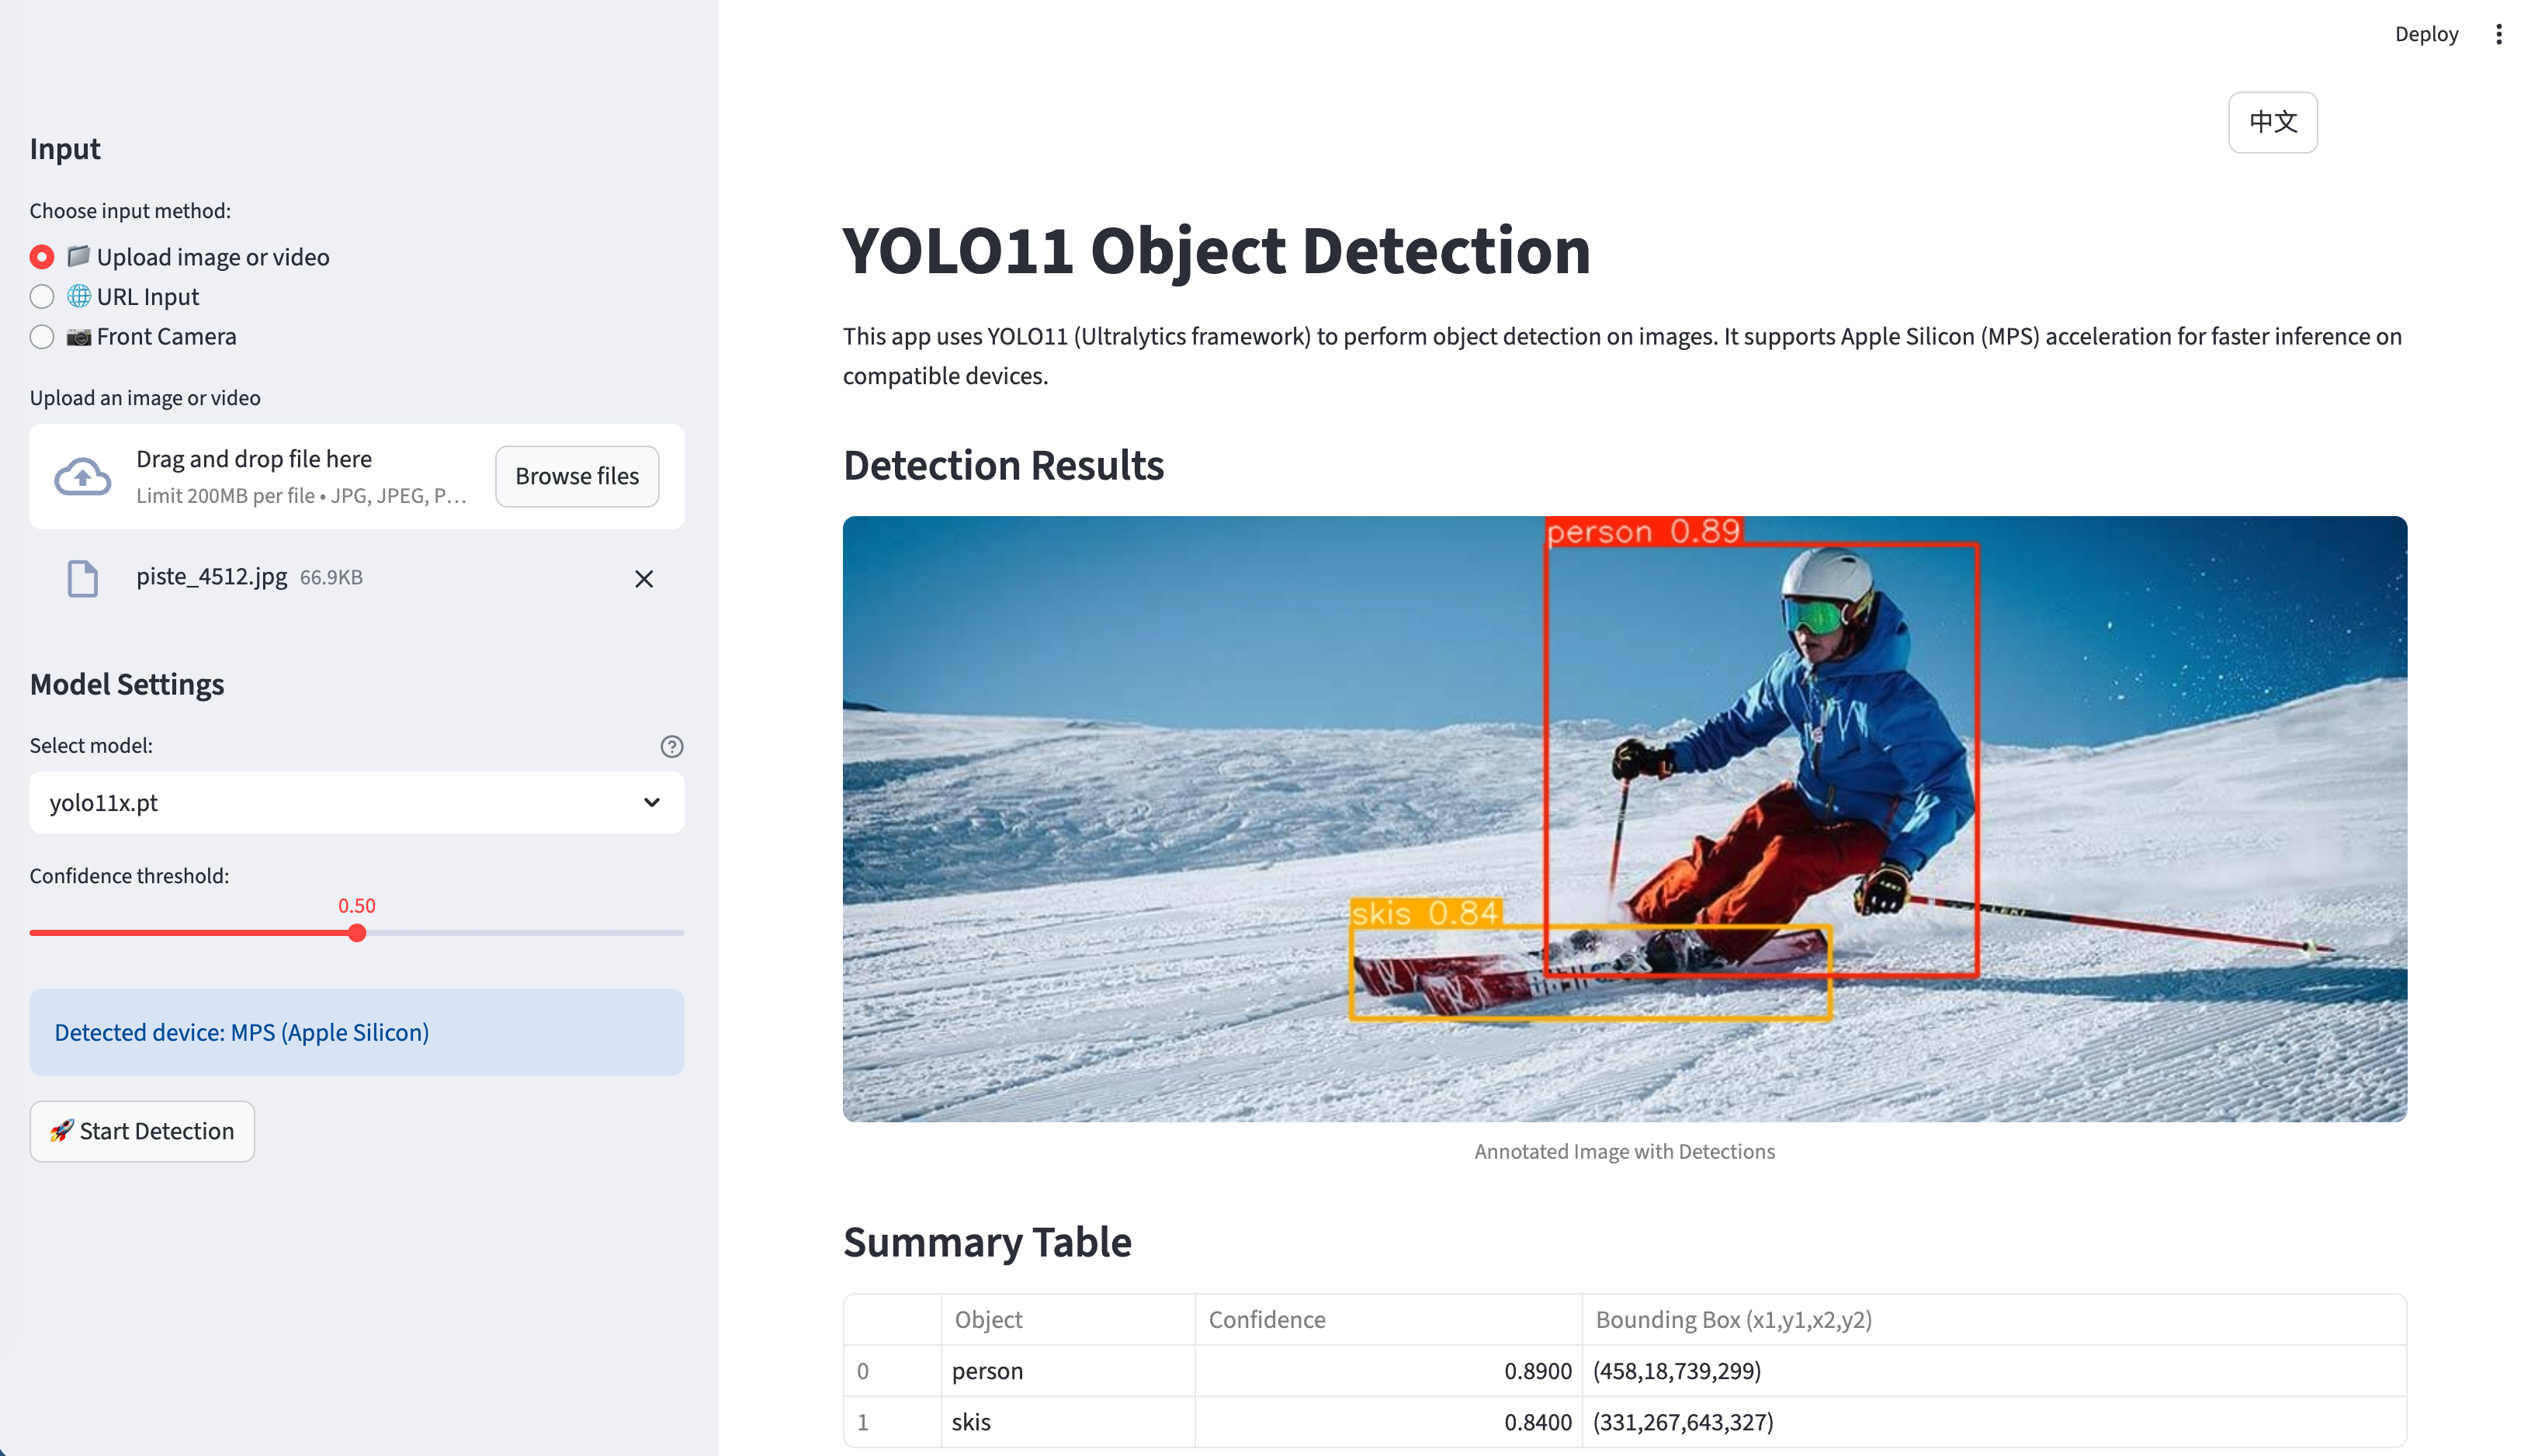
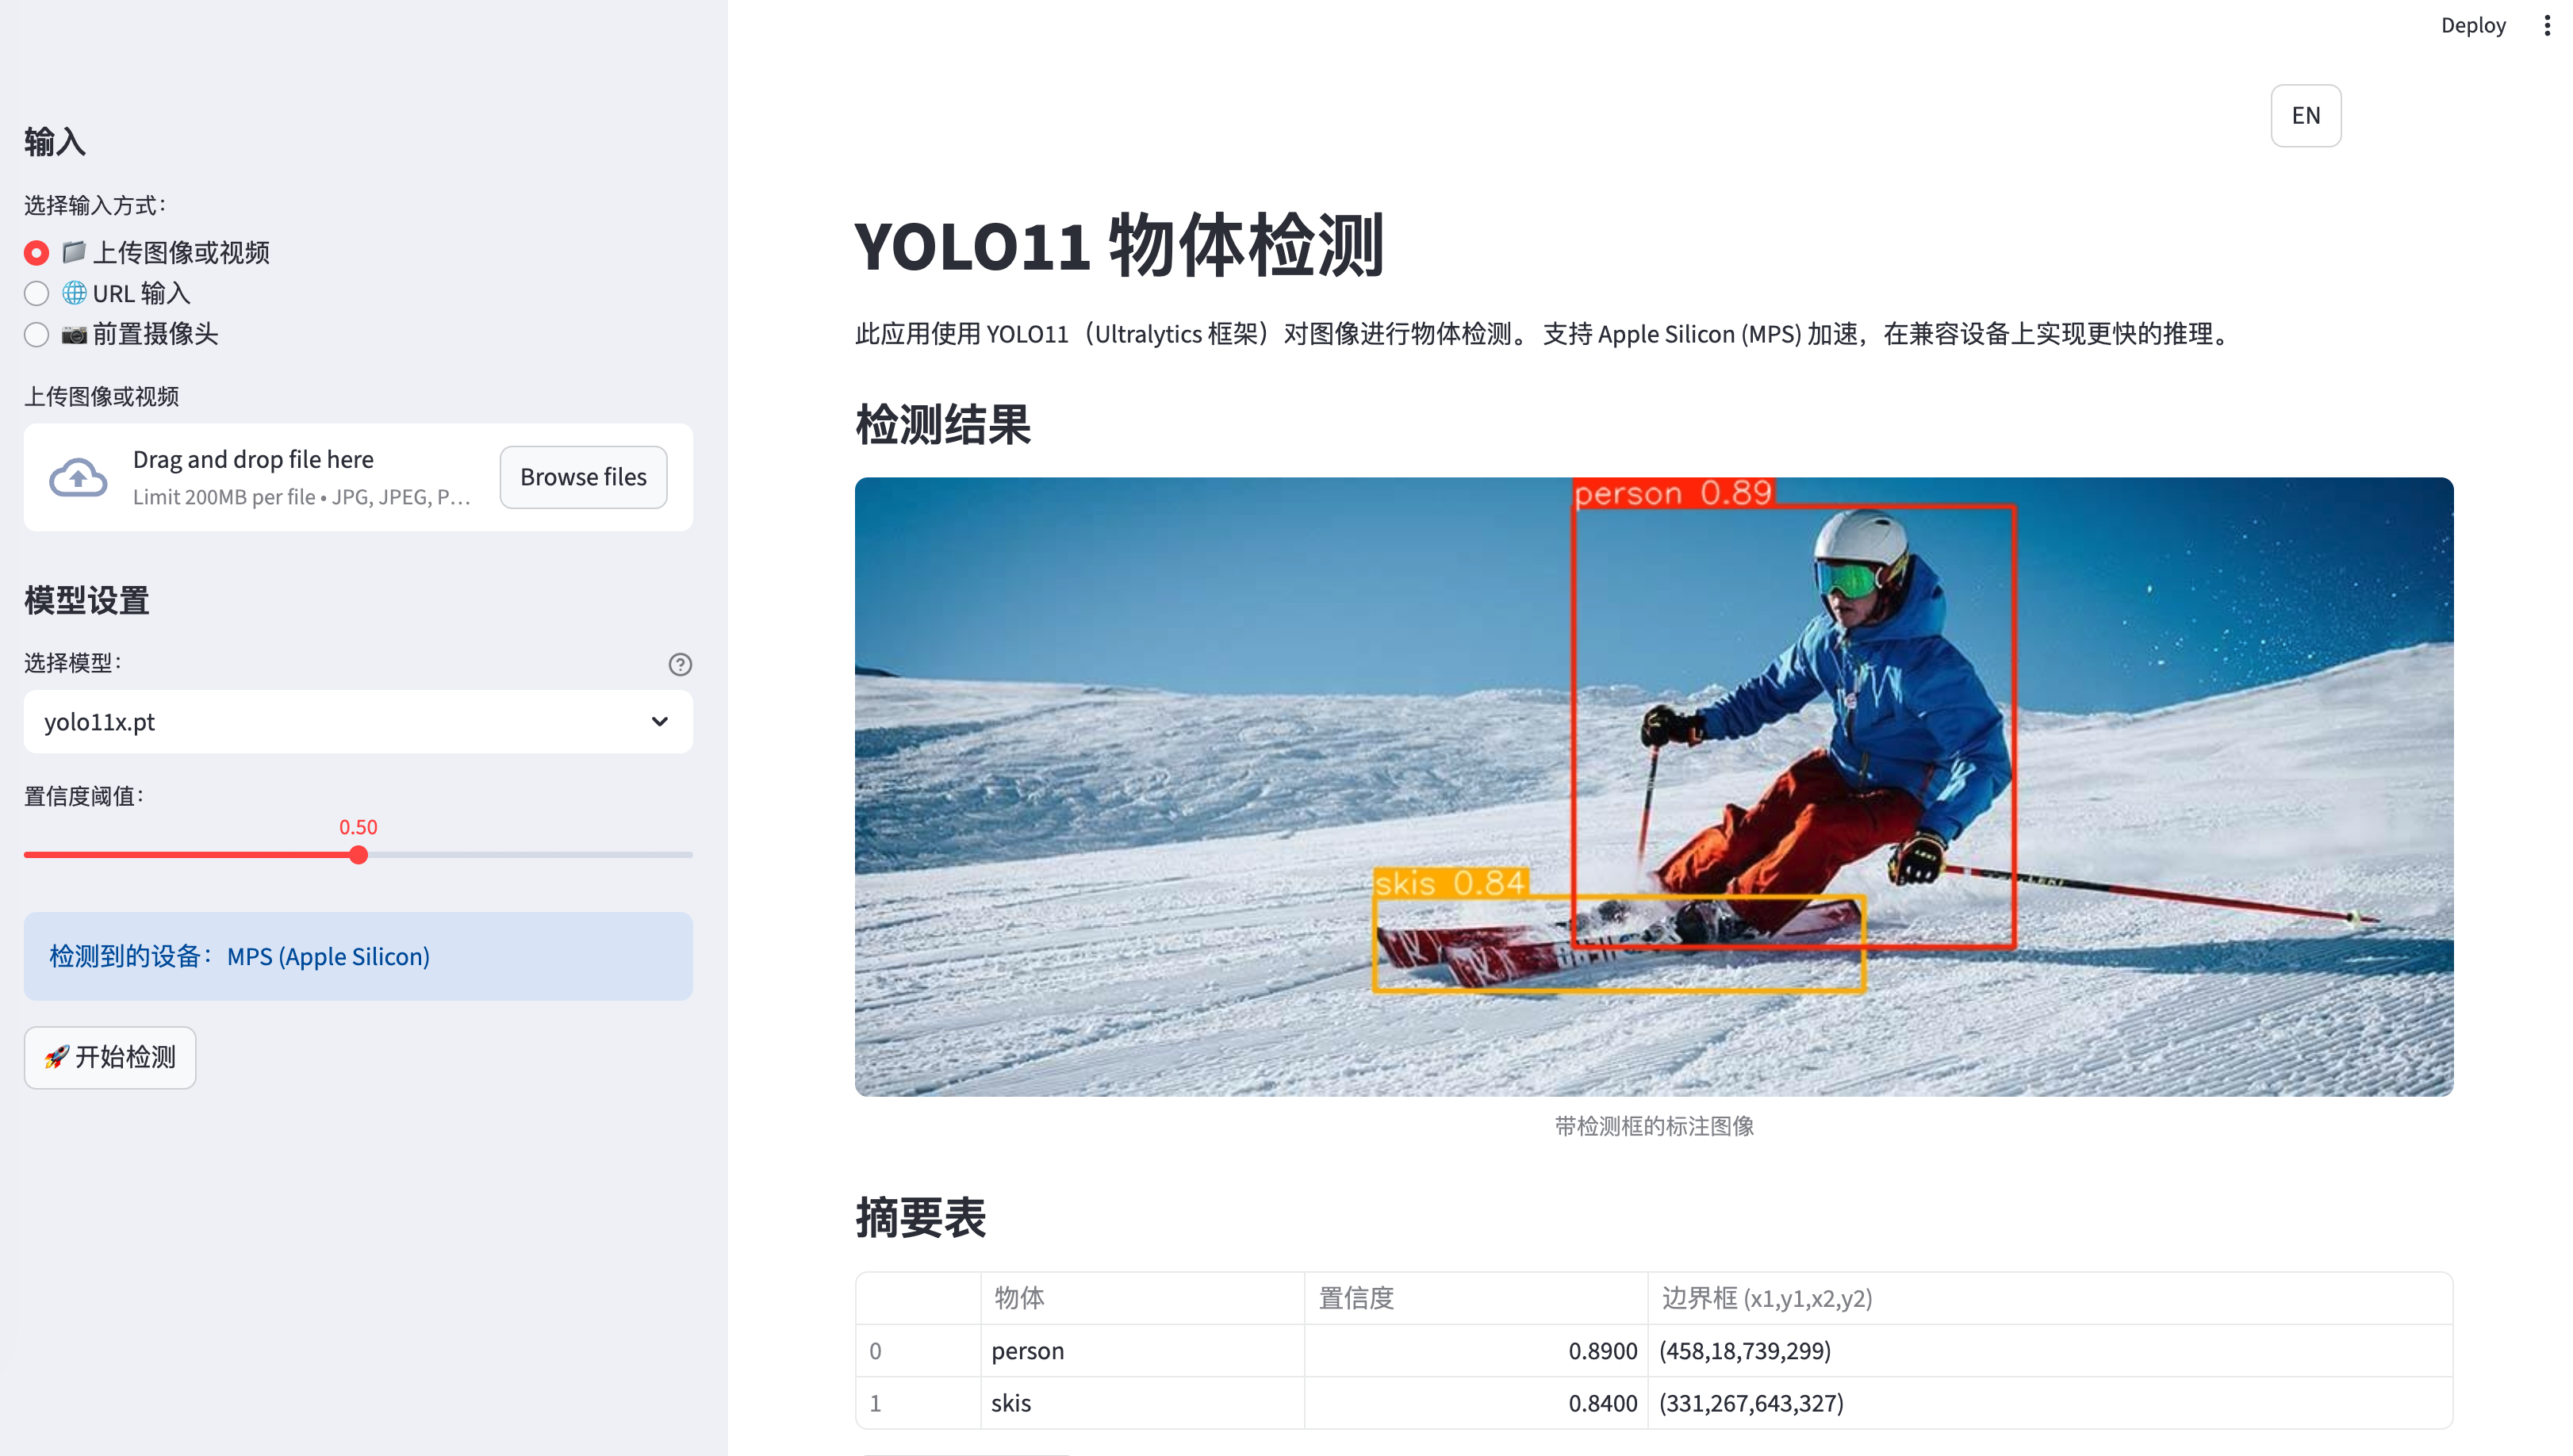
应用支持多种输入方式: - 文件上传:从本地存储上传图像和视频。 - URL 输入:直接从网络输入图像 URL。 - 实时相机:使用设备相机进行实时照片捕获。

多模型架构

其最突出的特性之一是支持不同的 AI 模型:

1. 本地 YOLO11 模型

  • 五种不同的模型变体(nano, small, medium, large, extra-large)。
  • 自动设备检测,支持 Apple Silicon 的 MPS 加速。
  • 在不支持加速的情况下自动回退至 CPU,确保更广的兼容性。

2. 云端模型

  • 通过 DashScope API 调用 Qwen-Image-Edit 进行高级图像标注。
  • 通过 OpenRouter API 调用 Gemini 2.5 Flash Image 进行前沿的图像处理。

高级功能

  • 双语界面:完整的英文/中文支持,包含 113+ 个翻译字段。
  • 智能 UI 管理:处理后自动隐藏输入图像。
  • 下载功能:支持将标注后的结果保存到本地。
  • 进度追踪:视频处理过程中的实时进度更新。
  • 会话管理:在用户交互过程中保持持久化状态。

技术架构

系统架构图

核心依赖

[project]
name = "yolo-app"
requires-python = ">=3.12"
dependencies = [
    "dashscope>=1.17.0",      # 阿里云 API
    "opencv-python>=4.11.0.86", # 计算机视觉
    "streamlit>=1.50.0",       # Web 框架
    "torch>=2.2",              # 深度学习
    "ultralytics>=8.3.0",      # YOLO 框架
]

应用程序结构

主应用程序 (app.py) 由 1,000 多行结构良好的 Python 代码组成,主要分为以下几个组件:

1. 国际化系统

Code
from language import translations

def get_translation(key, **kwargs):
    """使用当前会话语言的翻译函数"""
    lang = st.session_state.get("language", "en")
    text = translations[lang].get(key, translations["en"].get(key, key))
    return text.format(**kwargs) if kwargs else text

2. 设备优化

Code
def get_device():
    """自动检测最佳可用设备"""
    if torch.backends.mps.is_available():
        return "mps"  # Apple Silicon GPU 加速
    return "cpu"      # 回退至 CPU
 
# 模型加载与设备优化
device = get_device()
model = YOLO(selected_model).to(device)
st.info(f"Using device: {device.upper()}")

3. 图像处理流水线

Code
def encode_image_to_base64(image):
    """将 PIL 图像编码为 base64 字符串并进行尺寸压缩"""
    max_size_bytes = 8 * 1024 * 1024  # 8MB 限制

    formats_and_qualities = [
        ("JPEG", 95), ("JPEG", 85), ("JPEG", 75),
        ("WEBP", 95), ("WEBP", 85), ("WEBP", 75),
    ]

    for fmt, quality in formats_and_qualities:
        # 尝试不同的压缩策略
        # ... 压缩逻辑

多模型处理

本地 YOLO 处理

应用支持所有 YOLO11 模型变体,并具备自动性能优化:

Code
# 模型选择界面
model_options = ["yolo11n.pt", "yolo11s.pt", "yolo11m.pt", "yolo11l.pt", "yolo11x.pt"]
model_descriptions = {
    "yolo11n.pt": "Nano - 最快,精度最低",
    "yolo11s.pt": "Small - 均衡性好",
    "yolo11m.pt": "Medium - 推荐使用",
    "yolo11l.pt": "Large - 精度较高",
    "yolo11x.pt": "Extra Large - 精度最高"
}

selected_model = st.sidebar.selectbox(
    get_translation("model_selection"),
    model_options,
    index=model_options.index("yolo11s.pt"),
    format_func=lambda x: f"{model_descriptions[x]} ({x})"
)

# 带进度追踪的检测过程
def detect_objects(image, model, confidence_threshold=0.5):
    """执行带进度追踪的目标检测"""
    with st.spinner(get_translation("processing")):
        results = model.predict(image, conf=confidence_threshold)

        # 处理结果
        detections = []
        for result in results:
            boxes = result.boxes
            for box in boxes:
                x1, y1, x2, y2 = box.xyxy[0].cpu().numpy()
                conf = box.conf[0].cpu().numpy()
                cls = int(box.cls[0].cpu().numpy())
                class_name = model.names[cls]

                detections.append({
                    'class': class_name,
                    'confidence': conf,
                    'bbox': [x1, y1, x2, y2]
                })

    return detections, results

云端 API 集成

对于云端模型,应用负责 API 身份验证和请求格式化:

Code
def process_with_qwen(image, api_key):
    """使用阿里云 DashScope 提供的 Qwen-Image-Edit 处理图像"""
    try:
        response = MultiModalConversation.call(
            model='qwen-image-edit',
            input=[
                {
                    'role': 'user',
                    'content': [
                        {'image': f"data:image/jpeg;base64,{image_b64}"},
                        {'text': 'Please identify and label all objects in this image.'}
                    ]
                }
            ]
        )
        return response
    except Exception as e:
        st.error(f"API Error: {str(e)}")
        return None

用户界面设计

布局结构

应用程序采用专业的三个分栏布局:

  1. 侧边栏:模型选择、置信度阈值、语言设置。
  2. 主区域:输入方式选择、图像/视频显示、结果展示。
  3. 结果面板:检测统计、下载选项。

双语支持

翻译系统管理所有的 UI 元素:

Code
translations = {
    "en": {
        "title": "YOLO11 Object Detection",
        "upload_file": "Upload File",
        "camera_input": "Use Camera",
        # ... 更多字段
    },
    "zh": {
        "title": "YOLO11 目标检测",
        "upload_file": "上传文件",
        "camera_input": "使用相机",
        # ... 对应的中文翻译
    }
}

性能优化

模型性能对比

模型 参数量 mAP 推理时间 (CPU) 推理时间 (MPS)
YOLO11n 2.6M 37.2 15ms 3ms
YOLO11s 9.4M 45.5 28ms 6ms
YOLO11m 25.4M 51.2 52ms 12ms
YOLO11l 43.7M 53.4 84ms 18ms
YOLO11x 68.2M 54.7 126ms 26ms

Apple Silicon 加速

该应用会自动检测并在 Apple Silicon 设备上利用 Metal Performance Shaders (MPS):

Code
device = "mps" if torch.backends.mps.is_available() else "cpu"
model = YOLO(selected_model).to(device)

# 性能监控
import time
start_time = time.time()
results = model.predict(image)
inference_time = (time.time() - start_time) * 1000

st.metric(f"推理时间 ({device.upper()})", f"{inference_time:.1f}ms")

云端 API 的图像压缩

为了满足 API 的大小限制,应用实现了智能图像压缩:

Code
def compress_image_for_api(image, max_size=8*1024*1024):
    """压缩图像以满足 API 要求"""
    for quality in [95, 85, 75, 65]:
        for fmt in ["JPEG", "WEBP"]:
            buffer = BytesIO()
            image.save(buffer, format=fmt, quality=quality)
            if buffer.tell() <= max_size:
                return buffer.getvalue()
    return None

部署与生产特性

会话管理

应用程序维护着全面的会话状态:

Code
session_state_vars = [
    "current_image", "uploaded_image_bytes",
    "current_video", "uploaded_video_bytes",
    "camera_active", "camera_frame",
    "qwen_processed", "gemini_processed",
    "language", "input_method_index"
]

错误处理

健壮的错误处理确保了优雅的降级服务:

Code
try:
    result = model.predict(image, conf=confidence_threshold)
    st.success(get_translation("detection_success"))
except Exception as e:
    st.error(f"检测失败: {str(e)}")
    # 回退至备选处理方法

快速开始

前提条件

  • Python 3.12 或更高版本
  • 现代包管理器(推荐使用 uv)
  • 对于云端模型:需要 DashScope 和 OpenRouter 的 API 密钥

安装步骤

# 克隆仓库
git clone <repository-url>
cd YOLO_app

# 使用 uv 同步依赖(推荐)
uv sync

# 备选:使用 pip 安装
pip install -r requirements.txt

# 运行应用
streamlit run app.py

API 配置

创建一个包含 API 密钥的 .env 文件:

# 阿里云 DashScope API
DASHSCOPE_API_KEY=您的密钥

# OpenRouter API (用于 Gemini)
OPENROUTER_API_KEY=您的密钥

快速使用示例

基础图像检测

  1. 启动应用程序。
  2. 上传图像或提供图像 URL。
  3. 选择您偏好的 YOLO11 模型(推荐使用 yolo11s.pt)。
  4. 根据需要调整置信度阈值。
  5. 点击“开始检测”。
  6. 查看结果并下载标注后的图像。

实时相机检测

  1. 选择“使用相机”输入方式。
  2. 在提示时授予相机权限。
  3. 拍摄照片。
  4. 选择检测模型。
  5. 获取即时的目标检测结果。

云端模型处理

  1. 在侧边栏输入您的 API 密钥。
  2. 上传图像。
  3. 选择 “Qwen-Image-Edit” 或 “Gemini 2.5 Flash” 模型。
  4. 利用先进的 AI 能力处理图像。
  5. 将结果与本地 YOLO 模型进行对比。

未来增强方向

未来版本的潜在改进点:

  1. 更多模型:集成更多的云端 AI 服务。
  2. 实时视频处理:增强视频流处理能力。
  3. 自定义模型训练:允许用户训练自定义 YOLO 模型。
  4. 移动端优化:为移动设备支持提供 PWA 特性。
  5. 批量处理:同时处理多张图像。

结论

这款 YOLO 目标检测应用展示了如何构建一个复杂的、生产级别的计算机视觉系统。本地和云端模型的结合、双语支持以及全面的错误处理,使其不仅适用于开发环境,也适用于生产环境。

该项目展示了以下方面的最佳实践: - 使用现代包管理工具进行 Python 开发。 - Streamlit Web 应用程序架构。 - 计算机视觉 API 集成。 - 国际化与可访问性。 - 针对不同硬件平台的性能优化。

无论您是对计算机视觉、Web 开发还是 AI 应用感兴趣,本项目都为您提供了一个构建先进 AI 驱动 Web 应用的坚实基础。


Source Code
---
title: "使用 Streamlit 构建的 YOLO 目标检测应用"
author: "Tony D"
date: "2025-11-05"
categories: [AI, API, tutorial]
image: "images/0.png"

format:
  html:
    code-fold: true
    code-tools: true
    code-copy: true
    
execute:
  eval: false
  warning: false
  
  
---


# 项目概览

该应用是一个全面的 Streamlit Web 应用程序,利用 YOLO11(Ultralytics 框架)提供目标检测功能,支持多种输入源和处理后端。该项目的特别之处在于其多模型架构和生产级别的特性。


在线演示: [https://yolo-live.streamlit.app/](https://yolo-live.streamlit.app/)

Github: [https://github.com/JCwinning/YOLO_app](https://github.com/JCwinning/YOLO_app)


::: {.panel-tabset}

## 目标检测

![应用程序截图 - 主界面](images/0.png){width="100%"}

## 物体识别

![应用程序截图 - 检测结果](images/1.png){width="100%"}
:::


## 核心特性

### 多输入支持
应用支持多种输入方式:
- **文件上传**:从本地存储上传图像和视频。
- **URL 输入**:直接从网络输入图像 URL。
- **实时相机**:使用设备相机进行实时照片捕获。

### 多模型架构
其最突出的特性之一是支持不同的 AI 模型:

#### 1. 本地 YOLO11 模型
- 五种不同的模型变体(nano, small, medium, large, extra-large)。
- 自动设备检测,支持 Apple Silicon 的 MPS 加速。
- 在不支持加速的情况下自动回退至 CPU,确保更广的兼容性。

#### 2. 云端模型
- 通过 DashScope API 调用 **Qwen-Image-Edit** 进行高级图像标注。
- 通过 OpenRouter API 调用 **Gemini 2.5 Flash Image** 进行前沿的图像处理。

### 高级功能
- **双语界面**:完整的英文/中文支持,包含 113+ 个翻译字段。
- **智能 UI 管理**:处理后自动隐藏输入图像。
- **下载功能**:支持将标注后的结果保存到本地。
- **进度追踪**:视频处理过程中的实时进度更新。
- **会话管理**:在用户交互过程中保持持久化状态。

## 技术架构

```{mermaid}
%%| fig-cap: "系统架构图"
flowchart LR
    A[用户界面<br/>Streamlit] --> B[输入源]

    B --> C[文件上传]
    B --> D[图像 URL]
    B --> E[实时相机]

    A --> F[处理模型]

    F --> G[本地 YOLO11<br/>n/s/m/l/x]
    F --> H[Qwen-Image-Edit<br/>DashScope API]
    F --> I[Gemini 2.5 Flash<br/>OpenRouter API]

    G --> J[设备检测<br/>MPS/CPU]

    J --> K[结果<br/>标注后的图像/视频]
    H --> K
    I --> K

    A --> L[功能特性]
    L --> M[双语 UI<br/>EN/ZH]
    L --> N[下载结果]
    L --> O[会话管理]
```

### 核心依赖

```toml
[project]
name = "yolo-app"
requires-python = ">=3.12"
dependencies = [
    "dashscope>=1.17.0",      # 阿里云 API
    "opencv-python>=4.11.0.86", # 计算机视觉
    "streamlit>=1.50.0",       # Web 框架
    "torch>=2.2",              # 深度学习
    "ultralytics>=8.3.0",      # YOLO 框架
]
```

### 应用程序结构

主应用程序 (`app.py`) 由 1,000 多行结构良好的 Python 代码组成,主要分为以下几个组件:

#### 1. 国际化系统
```{python}
from language import translations

def get_translation(key, **kwargs):
    """使用当前会话语言的翻译函数"""
    lang = st.session_state.get("language", "en")
    text = translations[lang].get(key, translations["en"].get(key, key))
    return text.format(**kwargs) if kwargs else text
```

#### 2. 设备优化
```{python}
def get_device():
    """自动检测最佳可用设备"""
    if torch.backends.mps.is_available():
        return "mps"  # Apple Silicon GPU 加速
    return "cpu"      # 回退至 CPU
 
# 模型加载与设备优化
device = get_device()
model = YOLO(selected_model).to(device)
st.info(f"Using device: {device.upper()}")
```

#### 3. 图像处理流水线
```{python}
def encode_image_to_base64(image):
    """将 PIL 图像编码为 base64 字符串并进行尺寸压缩"""
    max_size_bytes = 8 * 1024 * 1024  # 8MB 限制

    formats_and_qualities = [
        ("JPEG", 95), ("JPEG", 85), ("JPEG", 75),
        ("WEBP", 95), ("WEBP", 85), ("WEBP", 75),
    ]

    for fmt, quality in formats_and_qualities:
        # 尝试不同的压缩策略
        # ... 压缩逻辑
```

### 多模型处理

#### 本地 YOLO 处理
应用支持所有 YOLO11 模型变体,并具备自动性能优化:

```{python}
# 模型选择界面
model_options = ["yolo11n.pt", "yolo11s.pt", "yolo11m.pt", "yolo11l.pt", "yolo11x.pt"]
model_descriptions = {
    "yolo11n.pt": "Nano - 最快,精度最低",
    "yolo11s.pt": "Small - 均衡性好",
    "yolo11m.pt": "Medium - 推荐使用",
    "yolo11l.pt": "Large - 精度较高",
    "yolo11x.pt": "Extra Large - 精度最高"
}

selected_model = st.sidebar.selectbox(
    get_translation("model_selection"),
    model_options,
    index=model_options.index("yolo11s.pt"),
    format_func=lambda x: f"{model_descriptions[x]} ({x})"
)

# 带进度追踪的检测过程
def detect_objects(image, model, confidence_threshold=0.5):
    """执行带进度追踪的目标检测"""
    with st.spinner(get_translation("processing")):
        results = model.predict(image, conf=confidence_threshold)

        # 处理结果
        detections = []
        for result in results:
            boxes = result.boxes
            for box in boxes:
                x1, y1, x2, y2 = box.xyxy[0].cpu().numpy()
                conf = box.conf[0].cpu().numpy()
                cls = int(box.cls[0].cpu().numpy())
                class_name = model.names[cls]

                detections.append({
                    'class': class_name,
                    'confidence': conf,
                    'bbox': [x1, y1, x2, y2]
                })

    return detections, results
```

#### 云端 API 集成
对于云端模型,应用负责 API 身份验证和请求格式化:

```{python}
def process_with_qwen(image, api_key):
    """使用阿里云 DashScope 提供的 Qwen-Image-Edit 处理图像"""
    try:
        response = MultiModalConversation.call(
            model='qwen-image-edit',
            input=[
                {
                    'role': 'user',
                    'content': [
                        {'image': f"data:image/jpeg;base64,{image_b64}"},
                        {'text': 'Please identify and label all objects in this image.'}
                    ]
                }
            ]
        )
        return response
    except Exception as e:
        st.error(f"API Error: {str(e)}")
        return None
```

## 用户界面设计

### 布局结构
应用程序采用专业的三个分栏布局:

1. **侧边栏**:模型选择、置信度阈值、语言设置。
2. **主区域**:输入方式选择、图像/视频显示、结果展示。
3. **结果面板**:检测统计、下载选项。

### 双语支持
翻译系统管理所有的 UI 元素:

```{python}
translations = {
    "en": {
        "title": "YOLO11 Object Detection",
        "upload_file": "Upload File",
        "camera_input": "Use Camera",
        # ... 更多字段
    },
    "zh": {
        "title": "YOLO11 目标检测",
        "upload_file": "上传文件",
        "camera_input": "使用相机",
        # ... 对应的中文翻译
    }
}
```

## 性能优化

### 模型性能对比

| 模型 | 参数量 | mAP | 推理时间 (CPU) | 推理时间 (MPS) |
|-------|------------|-----|---------------------|---------------------|
| YOLO11n | 2.6M | 37.2 | 15ms | 3ms |
| YOLO11s | 9.4M | 45.5 | 28ms | 6ms |
| YOLO11m | 25.4M | 51.2 | 52ms | 12ms |
| YOLO11l | 43.7M | 53.4 | 84ms | 18ms |
| YOLO11x | 68.2M | 54.7 | 126ms | 26ms |

### Apple Silicon 加速
该应用会自动检测并在 Apple Silicon 设备上利用 Metal Performance Shaders (MPS):

```{python}
device = "mps" if torch.backends.mps.is_available() else "cpu"
model = YOLO(selected_model).to(device)

# 性能监控
import time
start_time = time.time()
results = model.predict(image)
inference_time = (time.time() - start_time) * 1000

st.metric(f"推理时间 ({device.upper()})", f"{inference_time:.1f}ms")
```

### 云端 API 的图像压缩
为了满足 API 的大小限制,应用实现了智能图像压缩:

```{python}
def compress_image_for_api(image, max_size=8*1024*1024):
    """压缩图像以满足 API 要求"""
    for quality in [95, 85, 75, 65]:
        for fmt in ["JPEG", "WEBP"]:
            buffer = BytesIO()
            image.save(buffer, format=fmt, quality=quality)
            if buffer.tell() <= max_size:
                return buffer.getvalue()
    return None
```

## 部署与生产特性

### 会话管理
应用程序维护着全面的会话状态:

```{python}
session_state_vars = [
    "current_image", "uploaded_image_bytes",
    "current_video", "uploaded_video_bytes",
    "camera_active", "camera_frame",
    "qwen_processed", "gemini_processed",
    "language", "input_method_index"
]
```

### 错误处理
健壮的错误处理确保了优雅的降级服务:

```{python}
try:
    result = model.predict(image, conf=confidence_threshold)
    st.success(get_translation("detection_success"))
except Exception as e:
    st.error(f"检测失败: {str(e)}")
    # 回退至备选处理方法
```


## 快速开始

### 前提条件
- Python 3.12 或更高版本
- 现代包管理器(推荐使用 uv)
- 对于云端模型:需要 DashScope 和 OpenRouter 的 API 密钥

### 安装步骤
```bash
# 克隆仓库
git clone <repository-url>
cd YOLO_app

# 使用 uv 同步依赖(推荐)
uv sync

# 备选:使用 pip 安装
pip install -r requirements.txt

# 运行应用
streamlit run app.py
```

### API 配置
创建一个包含 API 密钥的 `.env` 文件:
```bash
# 阿里云 DashScope API
DASHSCOPE_API_KEY=您的密钥

# OpenRouter API (用于 Gemini)
OPENROUTER_API_KEY=您的密钥
```

### 快速使用示例

#### 基础图像检测
1. 启动应用程序。
2. 上传图像或提供图像 URL。
3. 选择您偏好的 YOLO11 模型(推荐使用 yolo11s.pt)。
4. 根据需要调整置信度阈值。
5. 点击“开始检测”。
6. 查看结果并下载标注后的图像。

#### 实时相机检测
1. 选择“使用相机”输入方式。
2. 在提示时授予相机权限。
3. 拍摄照片。
4. 选择检测模型。
5. 获取即时的目标检测结果。

#### 云端模型处理
1. 在侧边栏输入您的 API 密钥。
2. 上传图像。
3. 选择 "Qwen-Image-Edit" 或 "Gemini 2.5 Flash" 模型。
4. 利用先进的 AI 能力处理图像。
5. 将结果与本地 YOLO 模型进行对比。

## 未来增强方向

未来版本的潜在改进点:

1. **更多模型**:集成更多的云端 AI 服务。
2. **实时视频处理**:增强视频流处理能力。
3. **自定义模型训练**:允许用户训练自定义 YOLO 模型。
4. **移动端优化**:为移动设备支持提供 PWA 特性。
5. **批量处理**:同时处理多张图像。

## 结论

这款 YOLO 目标检测应用展示了如何构建一个复杂的、生产级别的计算机视觉系统。本地和云端模型的结合、双语支持以及全面的错误处理,使其不仅适用于开发环境,也适用于生产环境。

该项目展示了以下方面的最佳实践:
- 使用现代包管理工具进行 Python 开发。
- Streamlit Web 应用程序架构。
- 计算机视觉 API 集成。
- 国际化与可访问性。
- 针对不同硬件平台的性能优化。

无论您是对计算机视觉、Web 开发还是 AI 应用感兴趣,本项目都为您提供了一个构建先进 AI 驱动 Web 应用的坚实基础。

---


本博客由 ❤️ 和 Quarto 构建。